The continent of Stoneholm is the board the whole war is played on. This is a field guide to reading it: who owns what, where it's safe, and where the prizes are.
The shape of the map
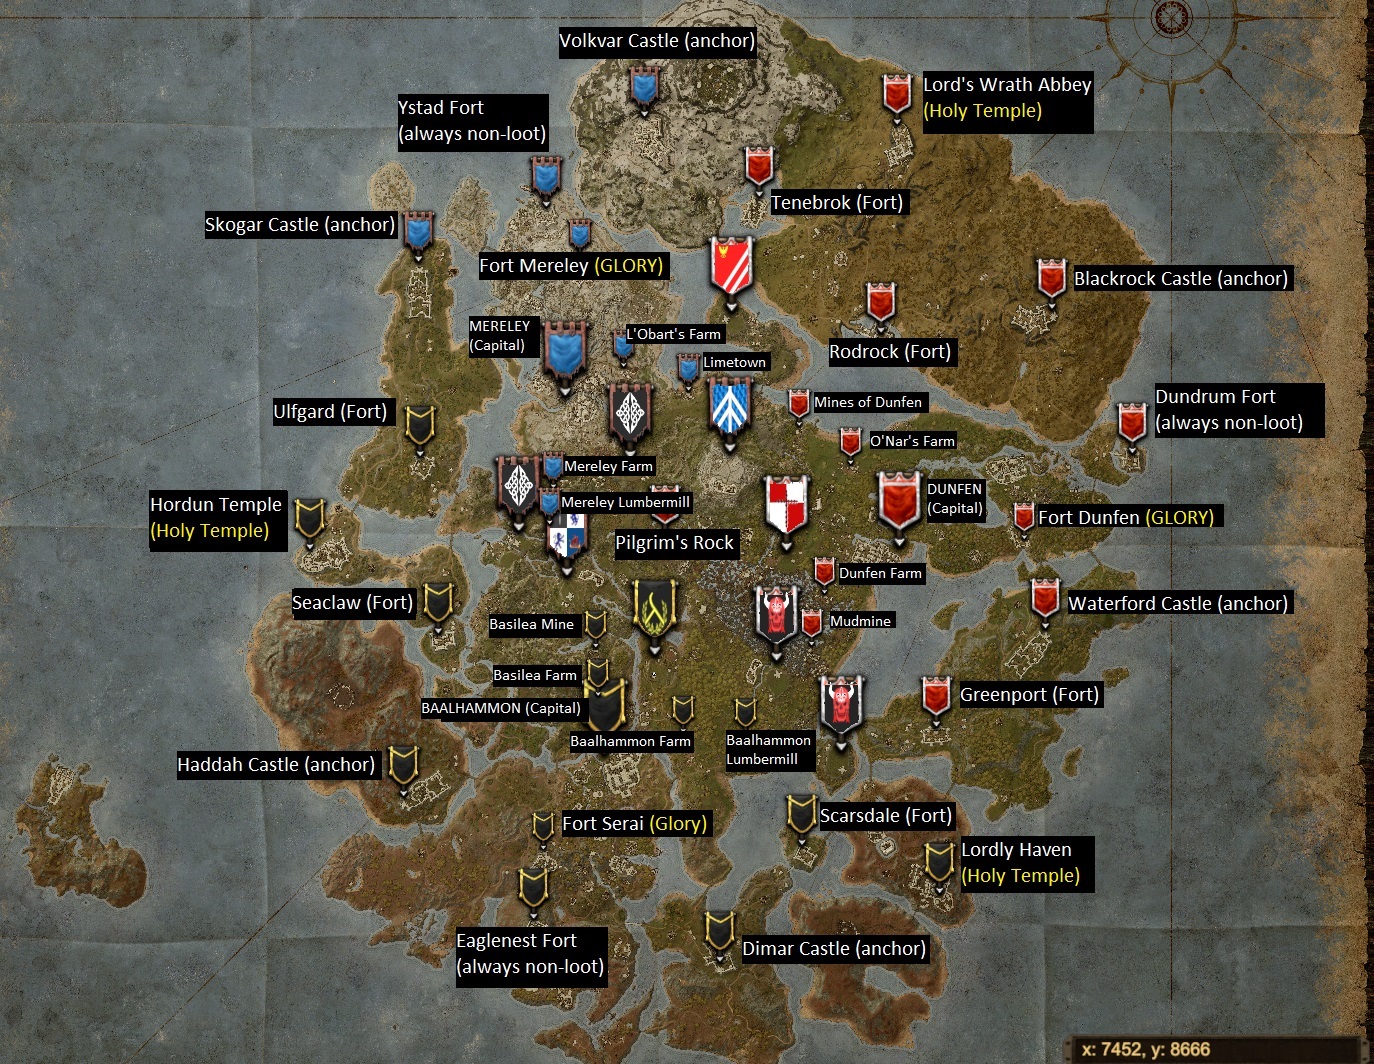
- Each nation's native territory runs from its capital out to two links in either direction.
- Ismir holds the snowy northwest (capital Mereley); Midland the grassy north and east (capital Dunfen); Sangmar the sandy south (capital Baalhammon).
- Between them is the contested centre — no one's native ground, dominated by guild provinces and stacked with the best events and resources.
- The frontline is any friendly hold next to enemy ground — where most PvP happens, and where you can't fast-travel during a siege.
Zones & siege states
Every location sits in one of the zone rulesets — safe, non-loot, or loot — shown on the minimap. When enemies arrive, the flag changes state for everyone to see, so you can't sneak straight to the walls:
| Flag state | What triggers it |
|---|---|
| Threatened | Several enemies near, or one with siege gear (as far out as the siege camps). Defenders can still teleport into a frontline at this stage. |
| Under Attack | An enemy at the walls without siege gear. Defenders can't teleport into a frontline. |
| Under Siege | An enemy at the walls with siege gear, or three-plus without. Defenders can't teleport in. |
Sub-locations — farms, mines and lumbermills — only ever show Under Attack, never Under Siege, however many enemies turn up.
The holds of each nation
Ismir (northwest)
- Tenebrok
- Hogsten Outpost
- Volkvar Castle
- Ystad Fort
- Fort Mereley
- Skogar Castle
- Reksvald Outpost
- Ulfgard
Midland (north & east)
- Griffinclaw Outpost
- Greenport
- Waterford Castle
- Dundrum Fort
- Fort Dunfen
- Blackrock Castle
- Elmridge Outpost
- Rodrock
Sangmar (south)
- Seaclaw
- Quilum Outpost
- Haddah Castle
- Eaglenest Fort
- Fort Serai
- Dimar Castle
- Scarsdale
- Saffa Outpost
Forts and cities are where you'll find the Logistician, Stablemaster, Depot and [Market](/wiki/economy-guides/the-market). The fort beside each capital (Fort Mereley, Fort Dunfen, Fort Serai) hosts the [Glory Vendors](/wiki/economy-guides/glory).
The Holy Temples
Each nation's territory is anchored by a Holy Temple — the source of recipes and items found nowhere else, set in high-conflict ground between two nations and guarded far more heavily than an ordinary hold. They also hold top-quality mines, lumber and farmland, so they're worth fighting for on every front.
- Hordun Temple (Ismir) — the only source of the Hordun Spear, the longest weapon in the game (tier 5).
- Lord's Wrath Abbey (Midland) — its Quartermaster offers recipes and items unavailable elsewhere.
- Lordly Haven (Sangmar) — the only source of the Lordly Haven Halberd, the longest cleaving weapon (tier 5).