Defence in GV is active and directional — you hold a block toward the threat, and it only stops what comes from the direction you're guarding. There is no passive damage avoidance; if you're not blocking the right line, you're taking the hit.
Reading the block indicator
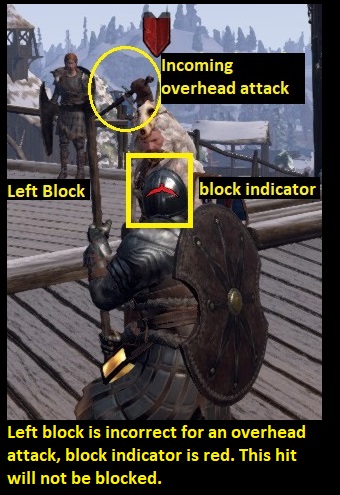
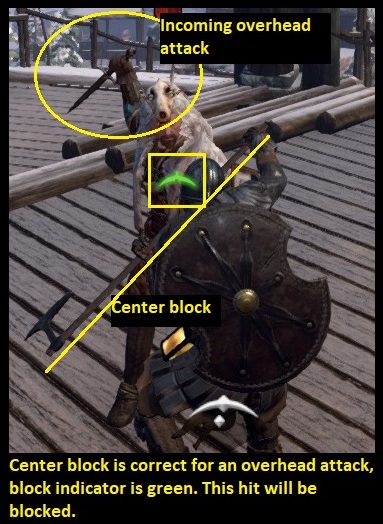
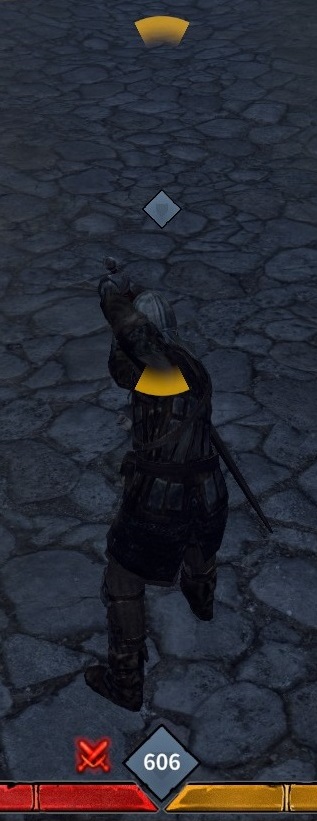
When a blow is incoming, a crescent-shaped indicator flashes up showing the direction it's coming from — though not its strength. Reading the indicator is often faster than reading the enemy's animation, and it's the backbone of defensive awareness. By default it shows red while the attack is still unblocked and turns bright green the instant you're guarding the correct line (both colours can be changed in the options).
You don't have to block everything. Choosing which blows to stop, which to let through, and which to chamber is itself a skill — guarding every single swing just bleeds resistance and stamina.
Directional blocking
To block, face the attacker and guard the direction the blow is coming from. A blow from your right answered by a left-facing block lands clean. Against multiple enemies you can only face one at a time — which is exactly why you don't fight outnumbered in the open, and why the shieldwall exists.
There are four [attack directions](/wiki/combat-guides/attack-directions) but only three blocks — left, right and centre, where a single **centre block stops both overhead *and* stab. A shield has no directional blocks at all: it's one block with a wide protective angle. A weapon covers a much narrower** angle and must meet the swing on the right line — which is why two-handed fighters live or die on their defensive timing and on chambering.
Keybinding your blocks — especially the centre block — is widely recommended over steering them with the mouse, because it lets you answer a stab or overhead instantly.
Perfect blocks, not turtling
A perfect block is one made within 300 ms of the incoming swing — the opposite of raising your guard early and turtling behind it. A perfect block costs much less resistance than a late or held block, on both a shield and a weapon. So the skill isn't holding a block up; it's timing it. Holding a guard up too long doesn't just waste resistance — it invites a kick or shield-bash and keeps you in combat mode where you can't regenerate.
Shield resistance
A shield carries a resistance pool that drains a little with every blow it blocks — including arrows. Run that pool to zero and your guard breaks: you're staggered and wide open for the follow-up. Managing shield resistance is the shield-user's version of managing stamina.
- Footman abilities raise the pool and cut the cost — *Vanguard* (more resistance), *Shieldman* (less stamina to block), *You Shall Not Pass* and *Last Stand* (recover resistance after blocking under pressure), and *Protector* (less loss when blocking arrows).
- Tune any of these in the Build Maker.
Don't hold a block forever. A patient enemy will kick or shield-bash a static guard apart, and blocking still bleeds your stamina. Block to survive the opening, then act.
Weapon block resistance
You don't need a shield to block — any weapon except a bow can guard — and weapons carry their own resistance pool, separate from a shield's. It works just like shield resistance, with its own bar between your health and stamina.
- Every weapon starts with 600 weapon block resistance and regenerates 6 per second — but landing an attack on an enemy restores 90 at once, so staying offensive funds your defence.
- Perfect blocks cost up to 50; late ('imperfect') blocks cost up to 70; holding a block past 3 seconds costs 100; and blocking at zero stamina costs up to 100. Timing beats turtling here too.
- Hit zero and you can no longer block with that weapon — switch to a shield. The pool is global, so you can't swap weapons to refresh it.
Chambering — the parry
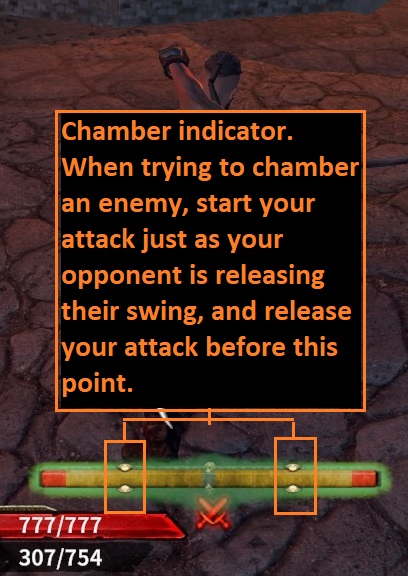
A chamber is the true parry: rather than absorbing a blow, you cancel it with a mirrored counterattack and land your own hit instead. As the enemy is about to release, start a swing on the matching line — an audio cue and an on-screen "chamber" confirm it landed. Their attack is erased; yours connects.
- Side cuts cross over — a left chamber catches an incoming swing from the left *or* right, and a right chamber catches one from the right *or* left.
- Verticals must match — chamber an overhead with an overhead, and a stab with a stab.
- Chambers cost no weapon block resistance at all, which makes them the most resource-efficient defence in the game — a skilled two-hander can fight on chambers alone.
- You can even chamber with a [shield bash](/wiki/combat-guides/kicks-feints-bashes) (a bash is an attack) — but your bash can be chambered in turn, and a mistimed chamber simply eats the hit.
If an opponent chambers you, your attack is cancelled and theirs lands — a net loss. Against a known chamberer, mix in feints and vary your timing so they can't read the line you're committing to.
Shields vs weapon blocking
You can block with a weapon alone, but a shield stops more, covers arrows far better, and is the backbone of any battle line. A two-hander trades that protection for reach, power and the ability to [cleave](/wiki/combat-guides/weapon-types) — and leans on chambering to make up the defensive gap — a different way to fight, not simply a worse one.
Blocking arrows
Raise your shield toward enemy archers to stop incoming arrows — it costs shield resistance, reduced by *Protector*. Under heavy missile fire, advancing behind shields is how a line crosses open ground without melting.