There are three types of armour — light, medium and heavy — and armour's primary job is to reduce the damage you take. Every armour can be equipped by any character; the choice of weight class is what shapes your playstyle. This guide is the full reference: what each class is for, how it trades away damage and stamina for protection, how shields work, and how you unlock higher tiers.
Overview
- You equip 6 pieces of armour plus a shield for defence. Higher tiers are unlocked through the Armour branch of Character Development.
- Each armour type is weakest to one specific [damage type](/wiki/combat-guides/damage-types) — reading what a foe is wearing and answering with the correct weapon can greatly increase the damage you deal to him.
- Wear 4 pieces of a single type for the Armour Set Bonus, which automatically raises all damage-reduction values by 10%. There is no additional bonus for wearing 5 or 6 pieces.
- Every piece carries a Stamina Drain Multiplier — the higher the value, the faster it drains stamina. Heavy armour drains the most, light the least. Stamina is needed to block, sprint, kick, and perform medium or strong attacks.
- Armour also lowers your damage output, shown as a cumulative damage multiplier for your whole kit. A full heavy set gives the lowest damage possible; a full six-piece set of top-tier light armour gives the highest. Archery is especially difficult in heavy armour.
| Weight class | Stamina drain | Damage output | Protection | Weak to |
|---|---|---|---|---|
| Light | Lowest | Highest | Least | Slashing |
| Medium | Moderate | Moderate | Fairly good | Piercing |
| Heavy | Very high | Very low | Very good | Bludgeoning |
Light Armour
- Made from cloth and leather in the Tailoring and Leatherworking professions.
- Has the lowest stamina drain and a high damage multiplier, but offers the least protection overall.
- Especially weak to slashing damage.
- A favourite of high-damage playstyles — archers, scouts, cavalry and skirmishers.
Medium Armour
- Made from a mix of leather, metal and cloth in Tailoring & Leatherworking and Armoursmithing.
- Moderate stamina drain, a moderate damage multiplier, and fairly good overall protection.
- Especially weak to piercing damage.
- A favourite of duelists, bruisers and swordsmen — anyone wishing to balance offence and defence.
Heavy Armour
- Made primarily from metal, with some leather and cloth, in the Armoursmithing profession.
- Very high stamina drain, a very low damage multiplier, and very good overall protection.
- Especially weak to bludgeoning damage.
- A favourite of shieldmen, heavy infantry, heavy cavalry and medics.
Shields
Shields block melee and ranged attacks when properly angled, covering a large blocking radius in front of the character. Players wanting to get *around* an enemy's shield need good positioning and the correct directional attack. Regardless of size or shape, all shields share the same blocking hit box.
Shields do not use directional blocking, but can be nudged up in front of the face to prevent head shots (use the tilde key to help with the camera while doing this). A shield worn on the back will block arrows but not melee hits.
Shields also reduce your damage output: a heavy shield −10%, a light shield −2%. A quick way for a melee fighter to up his damage is to swap a heavy shield for a light one — or unequip it entirely.
Shields can stun or stagger with the shield-bash ability — hold right-click, then left-click — if you've taken it in the abilities tree. A shield bash also deals a small amount of damage. See Kicks, Bashes & Feints.
Light Shields — For skirmishers and archers who want a little protection without sacrificing too much damage output.
- Low damage reduction
- Low shield resistance
- Much less durability than heavy shields
- Reduce damage output by 2%
Heavy Shields — For front-line fighters — they absorb large amounts of damage and withstand sustained attacks.
- High damage reduction
- Excellent shield resistance
- Excellent durability
- Reduce damage output by 10%
Shield resistance
Shield resistance is the measure of how much damage the shield and arm can take before being temporarily exhausted. It regenerates over time.

Higher resistance lets you absorb more hits before becoming temporarily exhausted — it simulates both the shield taking damage and the arm tiring from holding it. When resistance is depleted, nearby players hear the sound of splintering wood, and the holder must fall back to blocking with their weapon.
- Resistance regenerates over several minutes. A minimum of 100 is required to hold up a block at all.
- Axes and Breaker builds are the most effective at destroying shields.
- Heavy shields have far greater resistance than light ones, making them invaluable in shield walls and close-quarters fighting.
- Durability is tied to resistance — as a shield's durability drops, its maximum resistance drops too, so low-durability shields must be repaired or replaced to stay useful in a sustained battle.
Unlocking Armours in Character Development
Press `'` (quote) to open the Character Development screen and tab over to Armours. You do not need to fully max the lower-tier masteries to climb to the higher tiers — horizontal progression isn't required for vertical progression, as the tree below shows.
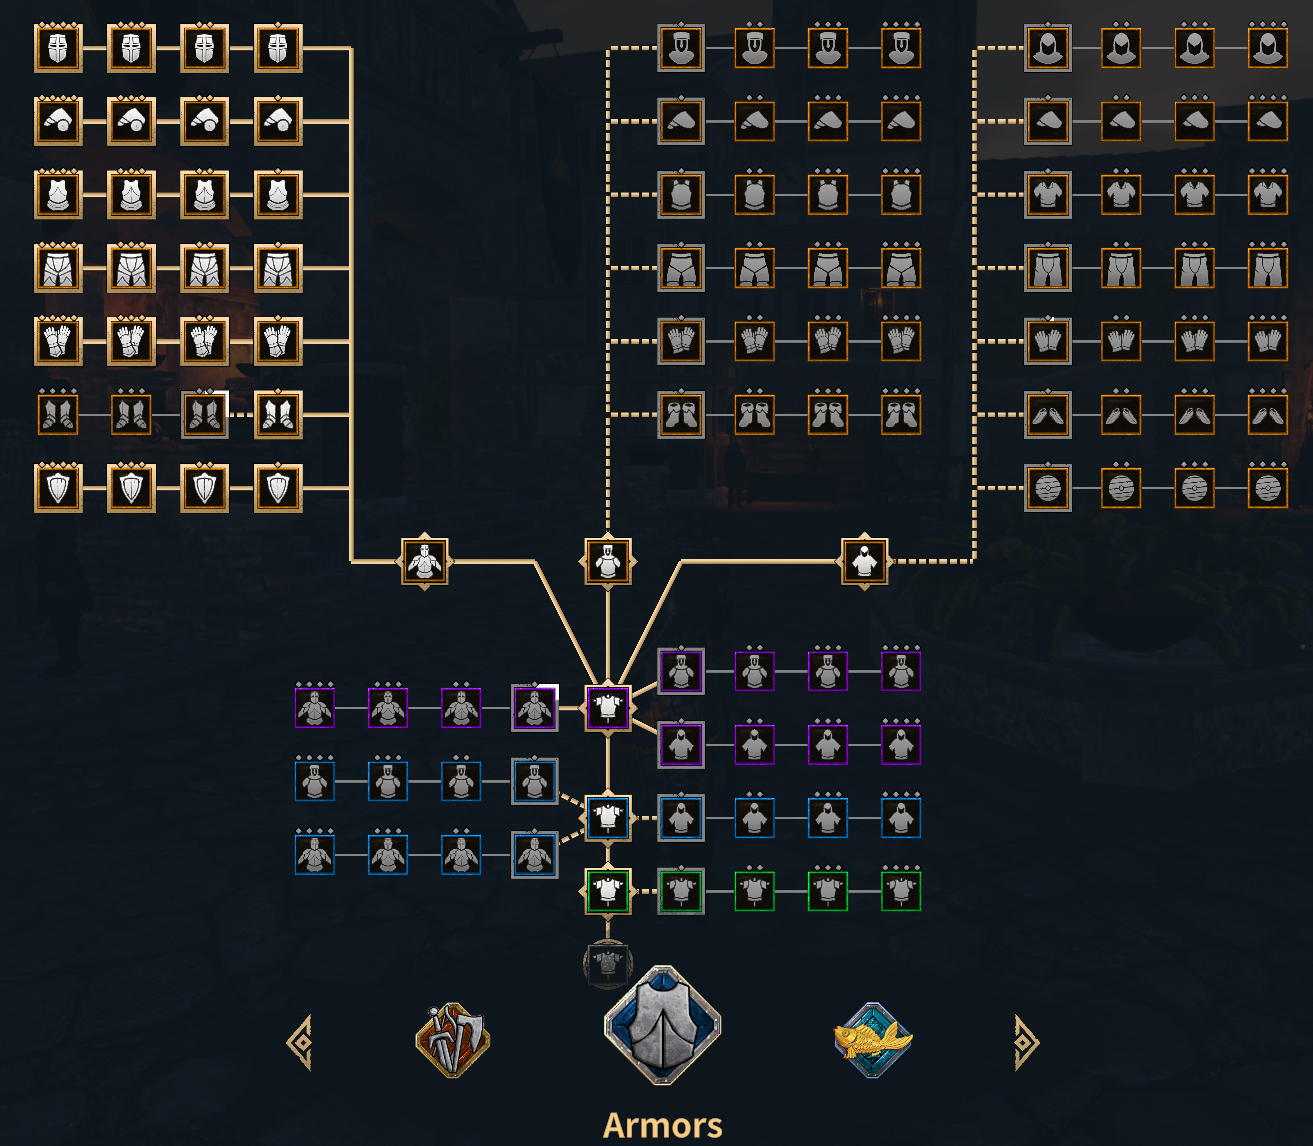
You begin in grey tier-1 armour and work your way up to tiers 2, 3, 4 and finally 5:
- To tier 2 — wear any tier-1 armour.
- To tier 3 — wear any tier-2 armour. Tier 3 splits into light, medium and heavy masteries; wearing any tier-3 armour earns XP toward tier 4.
- To tier 4 — wear any tier-3 armour against enemies of level 20 or higher. Tier 4 also splits into light/medium/heavy; wearing any tier-4 armour earns XP toward tier 5.
- To tier 5 — wear any tier-4 armour against enemies of level 35 or higher. Each weight class advances separately: tier-4 light unlocks tier-5 light, tier-4 medium unlocks tier-5 medium, and tier-4 heavy unlocks tier-5 heavy (all against level-35+ enemies).
Tier 5 is subdivided per armour piece within each weight class, and each must be mastered independently — simply wear the exact tier-5 piece you want to master:
Light Armour (tier 5)
- Helm
- Shoulders
- Chest
- Legs
- Gloves
- Boots
- Shields
Medium Armour (tier 5)
- Helm
- Shoulders
- Chest
- Legs
- Gloves
- Boots
Heavy Armour (tier 5)
- Helm
- Shoulders
- Chest
- Legs
- Gloves
- Boots
- Shields
Benefits of Armour Mastery
Each node of armour mastery grants one or more of the following. Hover over a node in the tree to see exactly what unlocking it gives you:
- Increases damage reduction by 2%
- Decreases armour durability loss by 10%
- Decreases shield durability loss by 10%
- Increases shield resistance by 3%
See also
Damage Types & Armour · Blocking, Parrying & Shields · Stamina & Endurance · the Crafting Guides for how armour and shields are made and upgraded.